
_edited.jpg)
Directionally Specific Exercises For Low Back Pain
- Jul 15, 2025
- 10 min read
This article is a transcribed, edited summary of a video Bob and Brad recorded in August 2024. For the original video, go to https://youtu.be/Wh3auqsF6nw
Mike: Not all back pain is the same. So, one exercise that works for one person may not work for another.
Brad: That's right. We're going to explain how you could determine which exercise is the right one for you, and then we're going to demonstrate the proper way to do the exercise. It's going to be great information.
Mike: Now, before we get into the exercises we're going to demonstrate, we want to talk about centralization. It's a term created by Robin McKenzie in 1956, and what does this term mean, Brad?
Brad: Well, Robin McKenzie, a physical therapist in New Zealand, actually started a whole system of treating back pain through centralization. So what it means is where the pain or the symptoms are experienced by the patient. So if you have pain in your back and it runs down your leg, we want to get the pain to actually disappear in the leg and bring it up towards the back. This would be known as the center, hence the name, centralization of the pain.

Brad: And then when you find an exercise that centralizes the pain, I'm smiling as a therapist, things are going to get better, and they're going to get better, better quick.
Mike: Now, in order to centralize your back pain, we're going to discuss three different movements your spine can do to help relieve the pain and feel better.
Brad: There you go. It's very simple.
Mike: So the three common motions to help with centralizations are first spinal flexion going forward.

Mike: Extension, or going backwards.

Mike: And then you have side bending to the right and left.


Mike: Now the spine can also rotate, but typically that leads to more pain. So we're not going to talk about that here.
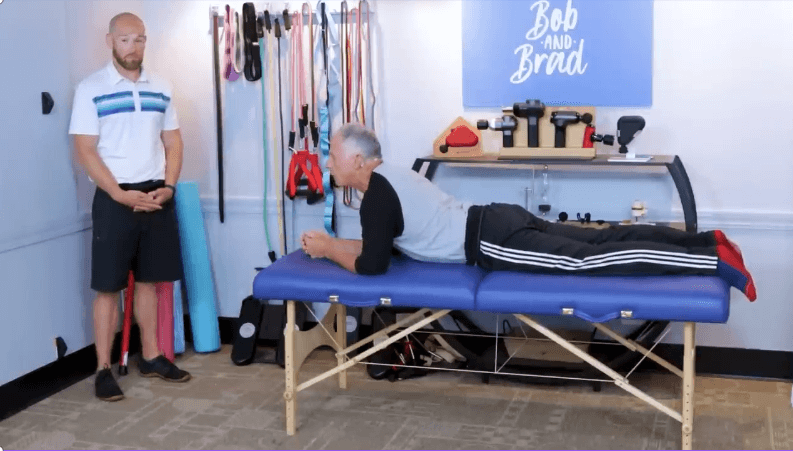
Brad: Now we just demonstrated the four directions to centralize a pain in standing, but very often we start doing it in a lying position. Mike is on his stomach, and he's going to demonstrate extension of the low spine, which actually is fairly common to centralize back pain. But by no means is it the only way to centralize. So just hold with us. This may help you, or there may be another direction that we will get to.
Mike: Now Bob happened to have back pain in the past, at least that's what he told us, and he used to do extension, and it would feel better.
Mike: But as time has progressed on due to whatever problem he may be having with his back, he actually prefers spinal flexion or bending forward. He tends to do the child's post stretch, which is this.
Mike: You can see my knees are actually coming to my chest, kind of in a passive way, and that is actually causing spinal flexion. This feels better for him now. So one exercise that maybe felt good for you, one time when you injured your back, may not be the right exercise if you re-injure your back in a different fashion.
Brad: Right? Example: I had the same situation when I was in my forties. I would lie on the ground and do the press-ups, and my back would feel better. Now I'm in my sixties. I actually do this exercise, it has to do with aging and spinal stenosis, but that's my personal case. So let's go on so people can figure out what their situation requires. Okay, now the first assessment to find out if this exercise is gonna be right, it's in a chair, seated, Mike's going to demonstrate. Now, if you have back pain and it happens to be going out to the side into the buttock by the right hip or even going down the leg, make a mental note of that and how severe it is. As you do these exercises, see if that pain, which could be numbness or tingling actually goes further out to the side or down the leg. If it does go further, that's no good. You need to stop. That is not the exercise for you. If it makes the pain feel better and it seems to be alleviated in the leg or the side, it goes back to the center, keep doing it. Go ahead, Mike.
Mike: So we're going to be doing spinal flexion here, so going forward. Notice in the chair, I'm not sitting at the way back, I'm sitting a little more up front. What I'm going to do is flex my spine with a little rotation. So as I go to the right, take my left hand, put it on my knee, I'm just going to bend forward, reach down as far as you comfortably can, and then back up. And we're gonna switch directions. Take my right hand, put it on my left knee, overlap, and then bend down, flex the spine, and come back up.
Mike: If this feels good, it means flexion is probably the right motion for you. If this feels worse, just avoid it. Now we have two more exercises you can try as well. What we're going to do is cross our legs, now get your knee in whatever position you comfortably can. And then once you're here, try to just flex forward. Again, flex that spine. If this feels good to you, then flexion is right. And again, cross your legs, do the other side. Oftentimes, with back pain, it's one-sided. So that's why it's good to test both sides.
Brad: And again, make sure the pain is centralizing. I like to, after the exercise, if I'm feeling better, actually stand up and walk around and make sure, as a result of doing the exercises, it continues to feel better or even better yet. So that is important while you're doing the exercise, and afterwards, that it continues to be the right direction.
Mike: Now we're going to move on to side-bending exercises. Again, you can try the left or right side. Brad's going to show an exercise. All you need is a wall and a towel,
Brad: Right. Typically, with these side-bending ones, you don't just side-bend, although you could, and see how it responds. This is one that Robin McKenzie actually used for decades now. And it works well. You can use a towel roll. You're going to put your arm, elbow bent 90 degrees, against your rib cage. And then you go against the wall. You can take a towel roll so there's more of a gap between your right hip and the wall. And then bring your feet about a foot, a foot and a half away from the wall, your feet together. And I'm going to stand just like this. I have my patients, I say put your hand on your hip and think about bringing your hip, or kind of pushing this hip towards the wall. And then we go like this.
Brad: So, how to determine which side you should do this exercise? If I have pain on my left side, in the back, left side, maybe down the left leg, I'll probably go with my right side against the wall first, and go one, two, and I'll do a few repetitions. If it hurts at first, kind of work with it, after three or four repetitions, if it gets worse, you stop. If it starts to feel better, then you continue 10 reps maximum. You'll continue to do that, if it feels better while you're doing it, and after walking around, you'll do that every hour or so to continue that centralization and the pain-free. Let's show some other options, Mike.
Mike: Another option for side bending. You can either use a door frame, pull-up bar, or something high up that you can reach. Brad will show another option in a moment seated if you can't reach up this high. So again, we're gonna focus on this side-bending component. I'm going to stretch my left side first. My palm is facing away from me. I'm going to go on top of the doorframe here. Then I'm going to lean into the door to get a little more aggressive stretch. You can try bending your knees slightly. This is really going to open up the lateral aspect of the spine, and sometimes this feels really good. Helps centralize that pain like we're talking about.
Mike: You could sit here for three breaths, 15, 30 seconds, whichever is comfortable for you, and then come back out. Now it's good to assess both sides to see which side feels better or needs help. So you can just try both sides. Once you figure out which side helps, just stick with that. Again, if this makes your pain worse, just avoid this stretch.
Brad: Okay, now, if you don't feel comfortable holding onto your door frame up here or you're too tall or too short, you can take a piece of dolling, actually like this. This is a walking stick. This would work well. I'm going to put that on the chair that you're sitting on, a firm chair's best here, and I'm going to grab up as high as I can. And now I'm going to lean into that without letting my hand go down. This happens to be the right height, this walking stick, and I'm going to go lean. If you have a piece of dolling PVC pipe or a Booyah Stik, that actually works really well, this is five feet long. That'll work for most people. And then don't let your hands slide down and lean and get that stretch again.
Brad: Note the pain. Is the pain centralizing, going to the center of the back, or is it making it worse? Again, you're looking for centralization. Then try the other side. There we go. This is a great stretch for the shoulder as well. Alright, good. Now, lastly, we're going to explore lumbar extension. That's bending backwards, standing. And then we're going to show it lying down for typical treatment for your back. Again, centralization. I like to put my hands like this or like this at the belt line.
Brad: Add support, and it usually feels better for most people, and you'll extend back and come forward. Do not hold it for long periods of time. We're just going to go back for a second or two and then forward and again, feels better or feels worse.
Brad: If it feels worse, it goes down the leg or out to the side more. You stop at, red light. If it feels better, continue up to 10 reps and then continue to do them. Now you can use the wall to actually make it a more aggressive stretch if it's going good.
Mike: So, what you're going to do is place your hands up as high as you comfortably can. You're going to have to stand a little bit of a distance away from the wall here. And then you're basically going to bring your hips and pelvis forward, going into the wall. As I do that, I'm feeling quite a bit of extension in my back. You're also getting a bit of a core workout here if I'm being honest with you.
Mike: So, same thing, just kind of do some repetitions. Hold for a few seconds and then come back. I have tight calf muscles, so my feet are popping off the floor, but it's fine, we're working on the back.
Brad: There you go. That's a nice shirt you got there, Mike.
Mike: Thanks.
Brad: Anyways, let's go to an extension and prone. You can do this lying down, and usually, I start assessing and do this in the prone position. Once I can do well in prone, I will go to the wall, but you don't have to do it that way. Lying down here, you're going to do this on a carpeted floor, not on a bed. Hands here and the press up, go up as far as you feel comfortable. When you start out, take your time with it. Don't press up as high as you possibly can.
Brad: Again, assessing whether it's centralizing or not. If it is, you can do up to 10 repetitions. Get up, walk around if it feels better as a result, and do that every hour. Other options, you can just come up and see if a static position, like on your forearm, like this, and see how things go.
Brad: I've had people do this, and after about 30 seconds, continue to centralize and decrease their pain; that is a good sign. You're going to do that every hour. Is there another one I'm missing?
Mike: I think you hit them all.
Brad: Alright, now that's good. Make sure you go through all these exercises. You can "X' off the ones that make it feel worse, or make the pain get worse down the leg, etc. And do the ones that feel good. There are probably one or two that will help centralize it. Focus on that one. Do it every one to two hours as the day goes on till the pain goes away. There we go.
Mike: And if you're still struggling with some back pain and you know it's sciatica, you can check out our other video.
Brad: "Only 1 In 5000 Know This About Treating Sciatica." This is a different approach. If this one's not working, it's by Rick Olderman, right?
Mike: Yeah. Let's count to 5,000 now.
Brad: He is an expert.
Mike: One. Two.
Brad: Oh, be quiet. Quit playing games. They know more than that.
Mike: Four.
For this week’s Giveaway, visit: https://bobandbrad.com/giveaways
Bob and Brad’s Products
Pain Management:
Fitness:
Stretching:
Check out our shirts, mugs, bags, and more in our Bob and Brad merchandise shop
Medical Disclaimer: All information, content, and material on this website are for informational purposes only and are not intended to serve as a substitute for the consultation, diagnosis, and/or medical treatment of a qualified physician or healthcare provider.
Affiliate Disclaimer: Keep in mind that we may receive commissions when you click our links and make purchases. However, this does not impact our reviews and comparisons. We are highly selective in our products and try our best to keep things fair and balanced to help you make the best choice for you.


Comments