
_edited.jpg)
How to STOP HIP PAIN Fast! All You Need to Know
- Nov 18, 2025
- 10 min read
This article is a transcribed, edited summary of a video Bob and Brad recorded in October 2024. For the original video, go to https://www.youtube.com/watch?v=gZozhqXkGRM&t=604s
Mike: So today, we are talking about hip pain and how to stop it fast. But Brad wants to get in a little explanation first.
Brad: That's right. The hip joint is an incredible joint. Look at the motion that Mike is doing, all with his hip.
Brad: He says he does this when he plays hacky sack. Let's look at the joint itself. It's a ball-and-socket joint, and the motions he did, if we look at them, work very well. The ball fits in the socket very smoothly. Everything works very well. But there are a couple of things that can go wrong with this ball and socket that can cause a lot of pain, and we're going to tell you how to fix it.
Mike: I hope my femur doesn't rip out like that just did.
Brad: Well, yeah, that is an issue.
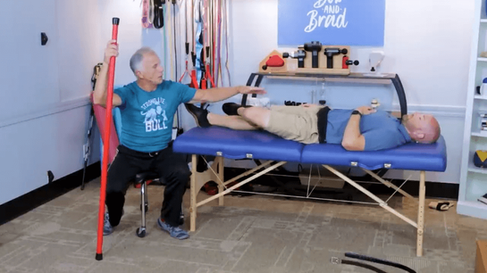
Mike: So the first problem we're going to look at is called femoral anterior glide syndrome. This issue was brought to us by Rick Olderman, a physical therapist. You can check out his work at RickOlderman.com. But in order to fix this problem, you're going to need a band, or you could possibly use a belt of some sort. And what we actually want to do is get the femur back in place, and Brad will explain that in a second. But in order to do it, you'll need a band or belt, and you'll need to start leaning forward to help get that femoral head back in place. Brad, I'm just talking in circles. You want to explain this?
Brad: Right, so if we look at what's going on with Mike and what the band is actually doing is the femoral anterior syndrome is when the ball actually comes forward. Like here, I'm exaggerating a little bit, but it'll be easy to understand. Now, that strap is going around the femur just below the ball and socket, and as he leans forward, it pulls it and helps it get back into place, so once again, proper mechanics are taking place, reducing the pain, getting things back to normal.
Brad: Mike has actually demonstrated that you can try sideways. Go ahead, Mike, you're better at talking on this.
Mike: So this is just another variation, depending upon where your femoral head is sitting in your socket, like Brad is showing. You could try forward or sideways. With a belt, you're not going to get this play where you can stretch it like this. It's going to be rather firm, and you're just going to push into it, and it won't move much. But we realize most people don't have bands like this at home.
Brad: Let's make it clear, Mike, that when they do this, you'll know it's the right thing to do, because with the pressure on it, it's going to feel good.
Mike: Yeah.
Brad: If it creates pain, particularly sharp pain, you stop. It is not the technique to use.
Mike: Now, this band will help get it back in place if this is your issue; however, most of the time, we have muscles in the front of the hip that are too tight and weak glutes. So we're going to show you a stretch to address the tight hips in front, and an exercise to strengthen your buttocks.
Brad: That's right. This way, it creates a long-term fix and solution. Now, you may wonder, why does this happen? One common cause is excessive sitting. So, for example, if you work as a truck driver or sit at a computer workstation, that allows the muscles in the front to get tighter. You do not use the glute muscles, so they get weaker, and it causes that imbalance, so that when you get up and walk around and move, it actually pulls that femoral head forward, and that's the syndrome that we talked about and just reduced and fixed with that strap. Mike, show them a nice stretch so that that muscle is no longer pulling the head out of place.
Mike: So we're going to stretch the hip flexor muscles. You're going to need something firm to lie on. You can try your bed, but if the edge is not firm, you might slide off. So maybe a countertop, a kitchen table, something you have, and you're going to bring both knees to your chest to start. If I'm stretching my left one, I'm simply going to drop it down off the edge of the mat, then I'm going to bend my knee, pull the opposite knee up towards my chest. You could see it raises up a little bit because my hip flexors are a little tight. Some people may be so tight, they're way up here. So just gradually sit in this stretch, try to breathe. Do it for 15 to 30 seconds on each side. Once you do one side, do it on the other side. Test to compare. One side might be tighter than the other.
Brad: Let's go through one more little thing. Go back to this one, Mike. Now, like Mike had mentioned, if you pull this foot underneath, that actually gets an additional muscle that is really critical to make this stretch successful, so make sure you do that. And the other thing is, do not let this knee drift out to the side like that. It is not effective. Keep it in line with the body there. Is that good, Mike?
Mike: That's good.
Brad: All right.
Mike: So do it two to three sets of 30-second holds, and that's a good stretch you can try. Now we want to strengthen the glutes. You can do this in a kneeling or standing position, because I realize some people are uncomfortable on their knees. So you're going to go on all fours. I'm going to be on my elbows.
Brad: But wait, Mike, I want to actually explain to them, make sure they understand. We moved it back in, and we stretched the muscles in the front. Now the glutes that Mike is referring to actually pull that joint back into place, so we're working stretching in the front, strengthening and pulling from the back, so you're working on both sides, assuring a long-term fix. And Mike is actually going at it right now.
Mike: I got bored. So what you want to do is a glute pump. We're not gonna do the normal one where you go bend your knee all the way up to the ceiling. Yes, this works my glutes, but it works out of hamstrings. We wanna isolate the glute max or your buttocks a little bit more.
Brad: Yeah, right there.
Mike: So we're just gonna pick a motion. Thank you for hitting me. And we're just going to do little oscillations like this. Feel that glute max engaging. If you don't feel much, try rotating your foot in and then performing. We're gonna do 30 repetitions on each side. Break it up however you need to. Three sets of 10, one set of 30, whatever works. Once that's easy, you can straighten the leg. That's easy, you can certainly throw a cuff weight on there as well.
Brad: That's right. Now, we realize this is not going to be possible for everyone to get on their hands and knees and do that, so you can do this in a standing position. Again, make sure you stretch the hips out first, as Mike demonstrated, and then you can do this in this manner. Hands against that cupboard, or a nice sturdy table or furniture. Bend the knee, and again, mid-range motion. We're trying to go as high as we can. The trunk is steady and still, and we can rotate like this to help isolate and get those glute fibers working more efficiently. And after you do this, I can already feel right there those glute muscles starting to fatigue.
Mike: So that is all part of the first problem. Now we're going to go into what may be causing your pain as well, so this would be problem number two.
Brad: Problem number two, arthritis. So many people know about arthritis, and they experience pain with it. So in arthritis, the ball of the hip actually loses the cartilage, it becomes rough, and it can be bone on bone. It's like having two rough surfaces grinding against each other, causing pain, and the muscles around it tighten up.
Brad: So what we want to do is relax the muscles holding the joint into place, and then put some traction and create a separation. I'm exaggerating a little bit. But we're separating it and getting some motion along with it. Mike's gonna demonstrate this. This allows the separation and synovial fluid, the natural lubrication of the joint, to get in there to help less pain and more free joint mobility throughout the day. Mike, take it away.
Mike: So in order to do this, you're going to need to be able to stand on a step and go sideways. Once you're here, you can use a rail for support if needed. You do not have to have a weight on initially when you're doing this exercise. I just have one on because it's going to put more of a pulling force downward. If you do not have a cuff weight at home, you can certainly use a heavy winter boot, something like that. So what I'm going to do is relax my hips. If my hips were engaged right now, I'd be level and even. This is putting the hip socket back in place. That's not what we want. We want to relax and distract. Notice how my hips and pelvis drop down.
Mike: Once I'm relaxed, I'm going to start swinging my leg back and forth. Again, my leg is relaxed, not contracted. You could just go back and forth for the duration of time if you prefer reps. You can also kind of go side to side a little bit. Whatever feels good for you.
Brad: That's right. And like Mike just said, whatever feels good. When you do this, I've had people do this, and they say, "Oh, that feels good." They got motion without pain, and then you know you're on the right thing. You can swing it there for one to two minutes. You'll get tired of balancing on the other leg.
Mike: My other leg is getting tired. I've been up here for a while. This one's working hard.
Brad: That's right. So use good judgment on that. And that can be done throughout the day as much as you would like, as long as you get consistent results. Okay, another option for an arthritic hip is some range of motion stretching in a non-weight-bearing position. So lying down like Mike is here, on the bed or the floor. If we look at the joint, we're going to actually move the hip at the flexion, actually pretty far range, as long as it's not painful, and then we're going to do some external rotation where it actually moves the joint this way.
Brad: Again, do not get too aggressive with this. The first time, it may feel a little pain, and then the next day you try it again, it gets better. You realize that the muscles and the tissues are tight, and releasing that tightness releases the stress from the joint, less pain. Go ahead, Mike.
Mike: What you want to do is lie on your back. Did I say that right? Lie or lay?
Brad: I think you're doing well with it. The English major will let us know.
Mike: So if you're very painful, maybe you can only get your knee to here, and that's enough, and that's perfectly fine. The goal is to eventually try to grab it with your hand. I like to grab behind my thigh and pull up. Maybe you're tight here and painful. Stop here. Wherever the pain is, just bump against it and hold it there for a nice stretch. Eventually, try to work up to getting your knee as close to your chest as you can on both sides.
Mike: I'm doing them individually because it'll be a little easier. If you struggle to really reach down and your hip's mobile enough, you could certainly put like a belt, a bed sheet underneath you, and just pull up this way and hold it like this. This is a good option.
Mike: For stretching, typically two to three sets of 30-second holds on each side is good. Make sure to perform it on the other side. Relax and breathe through it. Now, for the figure four stretch or that rotational component, some people may need to begin way down here, like this, and just put their foot rotating like this. This may be tight. I have seen people like this. Over time, try to bring your ankle up, your knee higher. Once you can hit your knee like this and this feels comfortable, start bending your other knee. This will start doing more rotation, and over time, maybe it's a few days, maybe it's a few weeks, try to get your hip up more. If you are already fairly flexible here, you can press down. Again, hold this for 30 seconds. Do it two to three times a day, and make sure to perform on both sides.
Brad: Right, now, I want to just emphasize, Mike, can you go back to the beginner's phase where it's, let's go the other leg, there you go. Now, if you're to the point where this is pretty difficult, you may not get to the end range.


Brad: It may take a couple of weeks to get to that point. But as you get through there, the hip should be feeling better and better day by day. So take your time with it. Do not overdo it. Too much too soon will be painful, so a word of caution. Okay, just a follow-up with what I just mentioned. After you do these stretches, make sure you walk around, and you should continue to feel, the hip should feel better as a result of doing the exercises. If you do them and you get up and it's painful, that means stop, no more exercises like that. You need to see the doctor and see what's going on. Maybe X-rays, something of that nature. Look into it closely.
Mike: If you want to check out more videos on hip pain, watch "Extreme Hip Pain Gone Instantly."
Brad: Right, that video has actually done very well, millions of views, and yeah, I think Liz is in there, so it's just not you, Mike.
Mike: Oh, oh, I get it.
Brad: I think that's the one, yeah.
Mike: I get it. I'm chopped liver.
Medical Disclaimer: All information, content, and material on this website are for informational purposes only and are not intended to serve as a substitute for the consultation, diagnosis, and/or medical treatment of a qualified physician or healthcare provider.
Affiliate Disclaimer: Keep in mind that we may receive commissions when you click our links and make purchases. However, this does not impact our reviews and comparisons. We are highly selective in our products and try our best to keep things fair and balanced to help you make the best choice for you.


Comments